Difference between revisions of "Cuprous Oxide Solar Cell"
Cmditradmin (talk | contribs) m (→Construction) |
Cmditradmin (talk | contribs) m (→Construction) |
||
| Line 48: | Line 48: | ||
Image:Oxidized.jpg|scraped copper revealing cuprous oxide underneath</gallery> | Image:Oxidized.jpg|scraped copper revealing cuprous oxide underneath</gallery> | ||
<br clear='all'> | <br clear='all'> | ||
Revision as of 16:41, 19 January 2012
| K-12 Outreach Kits and Labs |
Overview

When copper metal is oxidized it can take several oxidation states.
Cupric oxide with a copper(II) oxidation state is black
- 2 Cu + O2 → 2 CuO
cuprous oxide is with the copper(I) oxidation state is red.
- 4 Cu + O2 → 2 Cu2O.
Cuprous oxide is a semiconductor. It has a bandgap between it ground state and its conduction band. Without light some electrons are able to jump the band and it acts as a battery. With light the cuprous oxide jumps to the conduction band and increased electricity flows. In this design the charge moves through a gelatin electroylte and to a non oxidized collection electrode. Using a gelatin electrolyte is less messy that a purely liquid electrolyte. A solid clear conductor is not great for this application because it can not make uniform contact with the copper surface.
Materials

- Copper foil (snail tape) from the gardening store
- Wires and solder
- Clear rigid plastic sheet (old cd case, or plastic lid from salad container.)
- clear plastic packing tape
- clear gelatin
- table salt
- volt meter
Construction
The cuprous oxide
- Cut a 2" x 1" strip of the copper foil and remove the adhesive back.
- Place the foil sticky side up on an stove element under a stove hood fan. When the adhesive burns off a nasty black smoke is produced be sure to do this step with ventilation or out of doors.
- Turn the burner to high and watch as the copper foil turns from metallic to red to black. Let this cook for 10 minutes to build up a layer of oxide. The black oxide is necessary to create a protective layer that lets only a little oxygen reach the metal surface so it achieves the copper(1) oxidation state.
- After the strip cools down gently rub the surfaced with a paper towel to flake off the black cupric oxide and reveal the red cuprous oxide underneath.
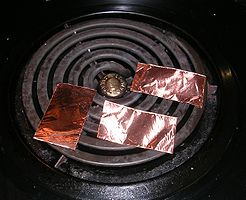
Copper before heating
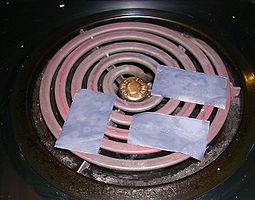
copper coated with cupric oxide
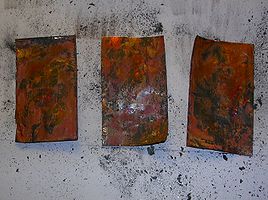
scraped copper revealing cuprous oxide underneath


The gelatin electrolyte

- Make a small batch of electrolyte gelatin by mixing a packet of clear gelatin and 1/4 cup of water and a tablespoon of table salt.
- Heat this pot on the stove or in a cup in the microwave until the solution is dissolved and clear.
- Pour the gelatin on to a sheet of smooth sheet of aluminum foil to create a layer about 1/8" and 1/4" thick. You can fold up the edges of the foil to make a tray.
- After the gelatin sets you should be able to peel away a leathery sheet of the material and handle it delicately.
Assembly

- Cut a 2" x 1" U shaped conductor from a new piece of copper tape.
- Solder a wire to one corner of the U shaped electrode
- Clean a corner with sandpaper and solder another wire to one corner of oxidized strip.
- Cut a piece 3"x 2" of rigid plastic.
- Attach the a strip or U shaped electrode of new copper to the rigid plastic using the adhesive on the back of the copper.
- Gently cut a 1" x 2" section of gelatin electrolyte with a knife and place this on the shiny electrode.
- Place the oxidized copper strip on top of the gelatin electrolyte making sure that it is completely separated from the shiny electrode by the gelatin layer
- Take single piece of plastic packing tape and carefully cover the electrode and gel sandwich so that the tape seals to the plastic sheet on all sides. This prevents the gelatin from drying out and helps keep the electrodes in contact with the gel layer.
Testing
- Now measure the current from the two wires.
- Place the cell under a bright light. You should see the current increase under the light.