Difference between revisions of "Solar Car Derby"
Cmditradmin (talk | contribs) |
Cmditradmin (talk | contribs) m (→External Links) |
||
| Line 118: | Line 118: | ||
[http://www.phillysolar.org/gallery2010.html 2010 Philadelphia Solar Sprint Derby] | [http://www.phillysolar.org/gallery2010.html 2010 Philadelphia Solar Sprint Derby] | ||
== Source for Materials == | == Source for Materials == | ||
Revision as of 13:28, 26 July 2012
| K-12 Outreach Kits and Labs |
Overview
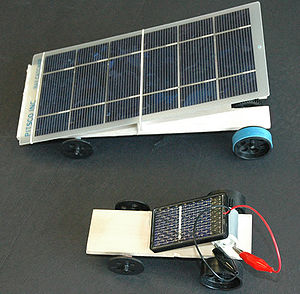
Model car races are a common science and engineering activity for youth groups because they are engaging, open-ended and have the excitement of competition. This gives us the chance to work in some great science concepts and engineering practices. The level of presentation can also be modified for different audiences. The Pitsco Sunzoom Lite ($8.95) and Ray Catcher Sprint Kit ($69) have all the materials for an extremely basic solar powered model car.
Procedure
In modeling good scientific experimental practice and engineering design methods its good to start with a basic "control" version of the car just as the kit instruction describe and then try to optimize various factors.
Basic construction
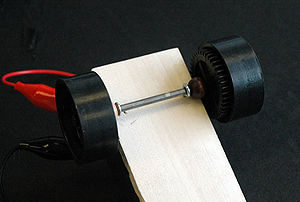
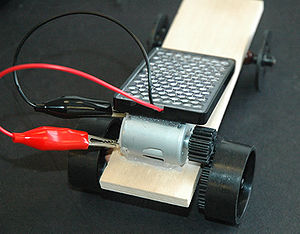
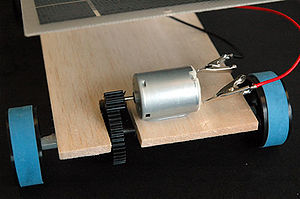
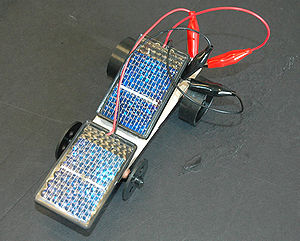
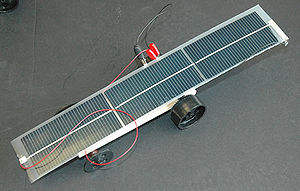
The basic design of the car is a piece of thin wood with screw eyes that serve as bearing for attaching the axles. The kits come with a set of gears which fit either on the motor shaft or on the axles. Be sure to make sure the motor engages the drive gear on the axle without rubbing or slipping. You can attach the motor with hot glue because it most likely will not have to change. Its better to attach the cell (s) with foam tape or rubber band so you can try different arrangements. if you have short time you can pre-assemble the screw eyes, motor and gears so that student just do the last step.
Let the races begin... When you have the basic model ready try a race. You can set up a side by side race or a race against a stop watch. Keeping track of times and variation in design reinforces the idea of methodical data collection in experimentation. In full sun either car should run freely until it reaches shade or an obstacle. If its not full sun or the surface is very rough you might have to give the cars a push to get them rolling. Let the students help develop the rules for the race, and develop categories if they feel that is more fair.
If you are using artificial light it is best to use 100 watt halogen spot lights because they have a focused beam and they emit part of their light in the infrared where silicon has extended absorption. Place the spotlight bulb in a clip on reflector holder which protects you from touching the outside of the bulb which can get very hot. Clip the light to a table or carefully hand hold it. In addition portable 500W halogen worklights are pretty inexpensive and these cast a wide light over the area.
Some cautions:
- The halogen bulb produces enough heat that if left directed at these solar cells 2 ft from away they can melt the plastic casing of the cells in 20 minutes. Its better to turn on the lights only during a race and follow the car along the race course with the beam of the light.
- These bulbs are not meant for rough use. Be careful when moving the holder or setting the holder down, especially if the bulb is turned on, or else you can jar the filament and burn out the bulb.
- Watch out for heat. Only adults should attempt hand hold the light. If you use worklights on the ground make sure the area is clear and that people do not walk near the lights.
Variations / New Designs
Once you have completed and raced the basic kits the students should have gained feeling for what factors might make a difference. Now it is time to design and build some variations. Rather than just turning kids loose with materials it is good to have them create a design on paper with these elements.
- Name of trial/model
- Sketch of model
- Special features
- How special features work
As a leader you can guide students through this process with a "socratic" dialogue. For example ask "What could you do to make your car go faster, and win the race?" If they suggest adding more solar cells then "How would you connect the additional solar cells?" , "How would you support them?", and "What do you predict the result will be?
Solar Cell Angle
Provided you have troubleshooted the basic drive train, wheels and body assembly the first variation that students may discover is that of angle. Students can fashion supports that turn the cell to be perpendicular to the incoming rays. Explain that the solar cells capture incoming solar energy according for an area equal to the shade. Use a loose solar cell to show how changing the angle changes the size of the shadow. Ask them to determine what angle would capture the most light. Some of the cells have a lens pattern on the cover glass which is supposed to make them work at a range of angles. You can make angle more important by arranging a race direction that is not advantageous for the current sun or light angle.
Solar Cell area
Adding more, bigger or better solar cells is the sure-fire method to improve power. Have students predict the winner for variations such as adding 2 or three additional cells, changing to a larger panel, adding reflectors to capture more light. Use an electric meter to measure the current and voltage that the proposed cells can produce in the given light. Compare this to the output from a single cell. They could also connect their cells to a motor and compare the speed rotation. Consider also the effect of wiring pattern. See wiring below.
Once they have selected the cells to use they have to figure way to attach and support them on the basic chassis. This may involve adding an additional support panel made from foam core or balsa.
Wiring
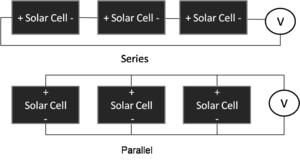
Two or more solar cells can be added with parallel or series wiring. In series the voltage of each cell is added and current is the same as any single cell. In parallel the current of each cell is added and the voltage is the same as an individual cell. Power is voltage x current. So for considering two cells.
.48V x 86 ma (parallel) = 41 mW = .96V x 43 ma (series)
Thus different wiring should not influence the total power delivered.
However motors are rated for a certain voltage range such as 1.5-6 volts. Each motor has its own characteristic performance issues such as needing a higher amperage to get started and then requiring more voltage to turn faster. One characteristic is needed to get rolling but another to win the speed race. A series circuit is sensitive to internal resistance of the cells. Further more, the maximum power output from a solar cell occurs at a certain combination of voltage and current. It is possible to force a cell to output at a combination of volts and amps that is not optimized for that cell.
The easiest way to answer the question of series and parallel wiring for multiple cells is to do the experiment!
Other factors
Students always want to streamline their models so they look cool and hope they will go faster. Wind resistance increases with the square of the speed. For this size model and at these low speeds wind resistance is a negligible factor.
Other factors that do make a difference is resistance against the axles, poor alignment of the drive gears, rubbing wires or rubbing wheels and chassis, and variability of each solar cell outputs.
Students can explore using some of the other gears in the kit. A smaller gear on the motor and bigger gear on the wheel will make it easier to get started if for example light conditions are low, but limit the speed once rolling. Increasing the gear on motor increases the relative speed of the wheels.
Derby Tools and Materials
Tools
- Hot glue gun and low temperature hot glue
- Foam double sticky Tape
- Duct tape
- Rubber bands
- Utility knife
- Clip leads
- Volt /multimeter
- Clip on light bulbs
- 100 Halogen Spotlight (gets a little when used very close)
- 100W fluorescent (good for prolonged exposure up close)
- 500 Halogen worklight on stand (very hot- works best for indoor race)
- Stopwatch
- Smooth surface for races
Materials
- Foam core
- Balsa
- Cardboard
- aluminum foil or aluminized mylar
External Links
NREL Model Solar Car Lesson Plan
2007 Philadelphia Solar Sprint Derby
2008 Philadelphia Solar Sprint Derby
2009 Philadelphia Solar Sprint Derby
2010 Philadelphia Solar Sprint Derby
Source for Materials
Pitsco polycrystalline solar panel with clips $2.95
Raycatcher car (big panel) $69
Electronics Goldmine solar cells
Solar mini car- $2.29 direct from China dealextreme- (delivery is slow)
