Difference between revisions of "Solar Car Derby"
Cmditradmin (talk | contribs) |
Cmditradmin (talk | contribs) |
||
| Line 16: | Line 16: | ||
<br clear='all'> | <br clear='all'> | ||
=== Basic construction === | === Basic construction === | ||
The basic design of the car is a piece of thin wood with screw eyes that serve as bearing for attaching the axles. The kits come with a set of gears which fit either on the motor shaft or on the axles. Be sure to make sure the motor engages the drive gear on the axle without rubbing or slipping. | The basic design of the car is a piece of thin wood with screw eyes that serve as bearing for attaching the axles. The kits come with a set of gears which fit either on the motor shaft or on the axles. Be sure to make sure the motor engages the drive gear on the axle without rubbing or slipping. You can attach the motor with hot glue because it most likely will not have to change. Its better to attach the cell (s) with foam tape or rubber band so you can try different arrangements. if you have short time you can pre-assemble the screw eyes, motor and gears so that student just do the last step. | ||
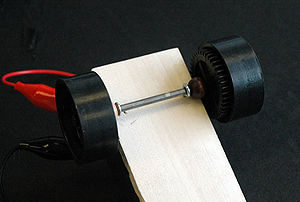
[[Image:Sunzoombearing.jpg|thumb|300px|Screw eyes form bearings, spacers keep wheels from rubbing ]] | [[Image:Sunzoombearing.jpg|thumb|300px|Screw eyes form bearings, spacers keep wheels from rubbing ]] | ||
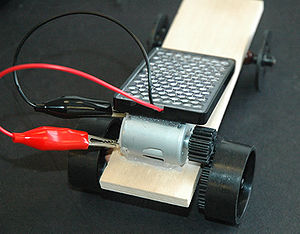
[[Image:Sunzoomgears.jpg|thumb|300px|The motor is position so it engages the gears. ]] | |||
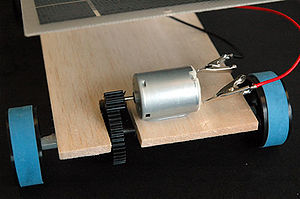
[[Image:Raycatchbearing.jpg|thumb|300px| The raycatcher requires a cut out for gear clearance]] | |||
'''Let the races begin...''' | |||
When you have the basic model ready try a race. You can set up a side by side race or a race against a stop watch. Keeping track of times and variation in design reinforces the idea of methodical data collection in experimentation. In full sun either car should run freely until it reaches shade or an obstacle. If its not full sun or the surface is very rough you might have to give the cars a push to get them rolling. Let the students help develop the rules for the race, and develop categories if they feel that is more fair. | |||
If you are using artificial light it is best to use 100 watt halogen spot lights because they have a focused beam and they emit part of their light in the infrared where silicon has extended absorption. Place the spotlight bulb in a clip on reflector holder which protects you from touching the outside of the bulb which can get very hot. Clip the light to a table or carefully hand hold it. In addition portable 500W halogen worklights are pretty inexpensive and these cast a wide light over the area. | |||
'''Some cautions:''' | |||
* The halogen bulb produces enough heat that if left directed at these solar cells 2 ft from away they can melt the plastic casing of the cells in 20 minutes. Its better to turn on the lights only during a race and follow the car along the race course with the beam of the light. | |||
* These bulbs are not meant for rough use. Be careful when moving the holder or setting the holder down, especially if the bulb is turned on, or else you can jar the filament and burn out the bulb. | |||
* Watch out for heat. Only adults should attempt hand hold the light. If you use worklights on the ground make sure the area is clear and that people do not walk near the lights. | |||
'''New Designs''' | |||
Once you have completed and raced the basic kits the students should have gained feeling for what factors might make a difference. Now it is time to design and build some variations. Rather than just turning kids loose with materials it is good to have them create a design on paper with these elements. | |||
*Name of trial/model | |||
*Sketch of model | |||
*Special features | |||
*How special features work | |||
=== Wiring === | === Wiring === | ||
Revision as of 13:02, 21 September 2010
| K-12 Outreach Kits and Labs |
Overview
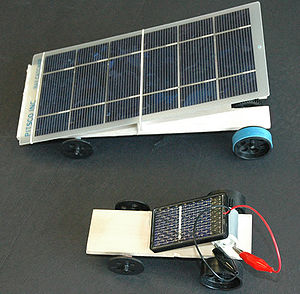
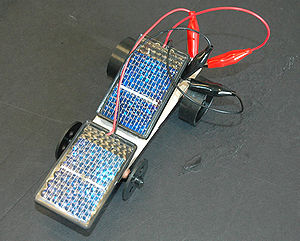
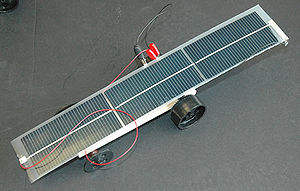
Model car races are a common science and engineering activity for youth groups because they are engaging, open-ended and have the excitement of competition. This gives us the chance to work in some great science concepts and engineering practices. The level of presentation can also be modified for different audiences. The Pitsco Sunzoom Lite ($8.95) and Ray Catcher Sprint Kit ($59) have all the materials for an extremely basic solar powered model car.
Procedure
In modeling good scientific experimental practice and engineering design methods its good to start with a basic "control" version of the car just as the kit instruction describe and then try to optimize various factors. As a leader you can guide students through this process with a "socratic" dialogue. For example ask "What could you do to make your car go faster, and win the race?" If they suggest adding more solar cells then "How would you connect the additional solar cells?" , "How would you support them?", and "What do you predict the result will be?
Basic construction
The basic design of the car is a piece of thin wood with screw eyes that serve as bearing for attaching the axles. The kits come with a set of gears which fit either on the motor shaft or on the axles. Be sure to make sure the motor engages the drive gear on the axle without rubbing or slipping. You can attach the motor with hot glue because it most likely will not have to change. Its better to attach the cell (s) with foam tape or rubber band so you can try different arrangements. if you have short time you can pre-assemble the screw eyes, motor and gears so that student just do the last step.
Let the races begin... When you have the basic model ready try a race. You can set up a side by side race or a race against a stop watch. Keeping track of times and variation in design reinforces the idea of methodical data collection in experimentation. In full sun either car should run freely until it reaches shade or an obstacle. If its not full sun or the surface is very rough you might have to give the cars a push to get them rolling. Let the students help develop the rules for the race, and develop categories if they feel that is more fair.
If you are using artificial light it is best to use 100 watt halogen spot lights because they have a focused beam and they emit part of their light in the infrared where silicon has extended absorption. Place the spotlight bulb in a clip on reflector holder which protects you from touching the outside of the bulb which can get very hot. Clip the light to a table or carefully hand hold it. In addition portable 500W halogen worklights are pretty inexpensive and these cast a wide light over the area.
Some cautions:
- The halogen bulb produces enough heat that if left directed at these solar cells 2 ft from away they can melt the plastic casing of the cells in 20 minutes. Its better to turn on the lights only during a race and follow the car along the race course with the beam of the light.
- These bulbs are not meant for rough use. Be careful when moving the holder or setting the holder down, especially if the bulb is turned on, or else you can jar the filament and burn out the bulb.
- Watch out for heat. Only adults should attempt hand hold the light. If you use worklights on the ground make sure the area is clear and that people do not walk near the lights.
New Designs Once you have completed and raced the basic kits the students should have gained feeling for what factors might make a difference. Now it is time to design and build some variations. Rather than just turning kids loose with materials it is good to have them create a design on paper with these elements.
- Name of trial/model
- Sketch of model
- Special features
- How special features work
Wiring
Solar Cell area
Solar Cell Angle
External Links
NREL Model Solar Car Lesson Plan
Source for Materials
Pitsco polycrystalline solar panel with clips $2.95
